The warning flashes across your handset. A single cell has drifted from the others, and the rebreather is telling you something needs attention. For many closed-circuit divers, this moment triggers a familiar question — silence the alarm and continue, or pause and investigate? The answer should always be the latter.
Cell warnings are not malfunctions to be dismissed. They are diagnostic opportunities. Every alert is the rebreather communicating that its internal checks have found a discrepancy worth investigating, and the diver who understands how to interpret that information holds a significant safety advantage over one who simply clears the screen and carries on.
This post walks through the mechanics behind cell warnings on AP rebreathers, the proper technique for a diluent flush, how to calculate and verify expected PO2 values at depth, and how to make sound decisions when a warning persists. Whether you are newly certified on closed circuit or have thousands of hours on a loop, these fundamentals deserve regular review.
How Cell Warnings Are Triggered
AP rebreathers monitor three oxygen cells simultaneously. The system continuously compares each cell’s reading against the average of the two closest values. When any single cell deviates from that average by more than 0.2 bar, the unit generates a warning.
This voting logic is elegant in its simplicity. It does not tell you which cell is correct — it tells you that the cells no longer agree within an acceptable margin. The distinction matters. Two cells reading similarly does not guarantee accuracy. It only means they agree with each other. The diver’s role is to determine which reading reflects reality.
Understanding this principle is the foundation of every decision that follows. The rebreather flags the disagreement. The diver resolves it.
The Diluent Flush: Your Primary Diagnostic Tool
When a cell warning appears, the diluent flush is the single most effective diagnostic procedure available. It introduces a known gas into the breathing loop so you can compare what the cells display against what physics says they should display.
Proper Technique
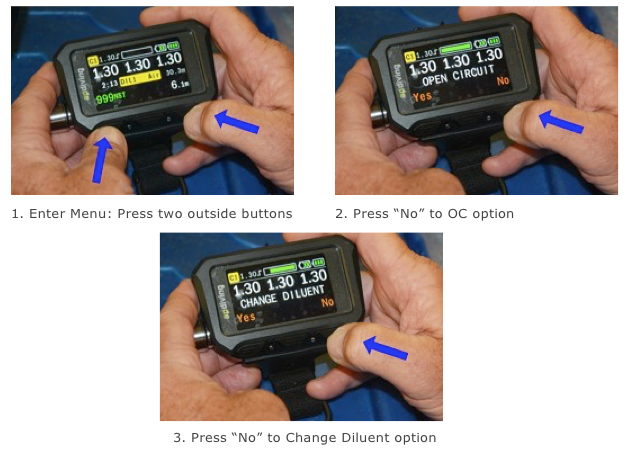
Before flushing, switch to low setpoint first. On an AP unit, this means holding the middle button. This step is critical because it prevents the solenoid from firing oxygen into the loop while you are simultaneously trying to reduce PO2 with diluent. Without this step, the machine works against your diagnostic effort.
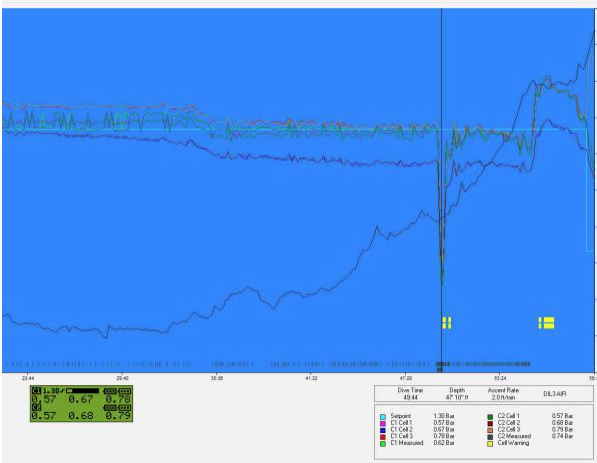
With low setpoint engaged, execute a five- to ten-second diluent flush while watching the handset display. The PO2 reading should drop rapidly and settle at the value you would expect for your diluent gas at the current depth.
What You Should See
All three cells should respond at roughly the same speed and converge on the same value. A cell that lags noticeably behind the others, overshoots, or settles at a different number is providing important information about its condition. The flush transforms an abstract warning into observable, interpretable data.
Calculating Expected PO2 After a Flush
A diluent flush is only useful if you know what the display should read. There are three practical methods for determining the expected PO2 at your current depth.
Mental Arithmetic
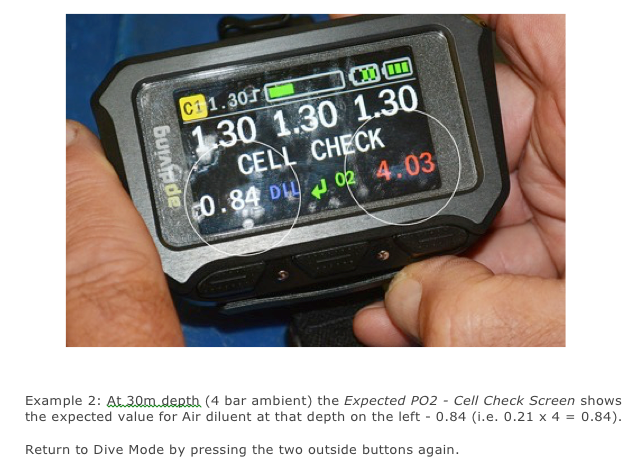
The calculation is straightforward. Multiply the oxygen fraction of your diluent by the ambient pressure in bar. At 30 metres on air diluent, for example, the ambient pressure is 4 bar (30 divided by 10, plus 1 for surface pressure). Multiply 0.21 by 4, and the expected PO2 is 0.84. This is a calculation every CCR diver should be able to perform without hesitation.
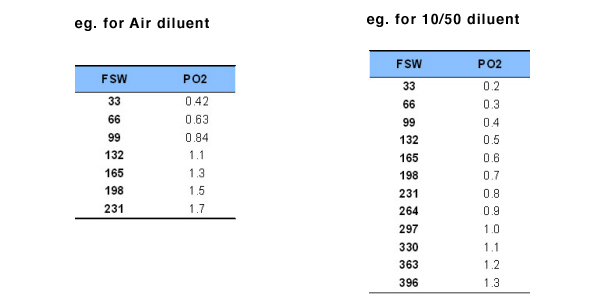
Pre-Dive Reference Tables
For divers who prefer not to calculate under task loading, a simple reference sheet solves the problem. Create a table for each diluent you carry — columns for depth, rows for expected PO2 — and attach it to your wrist slate or wet notes. The investment of five minutes before a dive can save critical seconds during one.
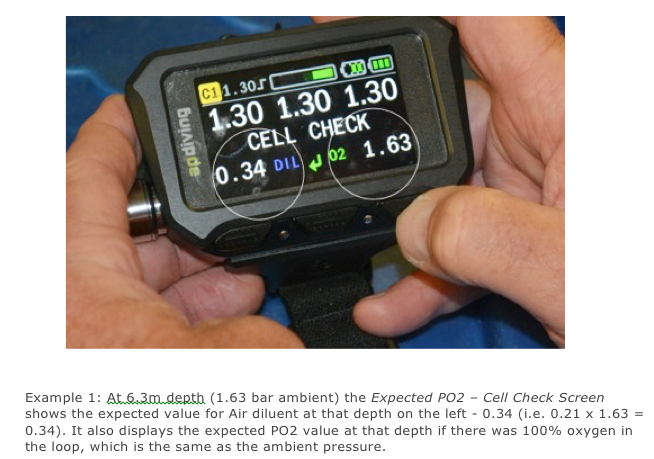
The Vision Handset Cell Check Screen
AP’s Vision electronics offer a built-in tool that many divers underuse. Navigate through the menu to the Cell Check screen, which displays each cell’s individual reading alongside the expected value. This provides an immediate, at-a-glance comparison without requiring any arithmetic at depth.
Interpreting the Results
After flushing diluent and observing the cell responses, the picture becomes clearer. If all three cells drop uniformly to the expected PO2 and respond at similar speeds, the warning may have been triggered by a transient event — a brief delay in one cell’s response during a depth change, for instance.
If one cell reaches the expected value while the other two do not, that single cell is likely the accurate one. When you return to high setpoint and the solenoid adds oxygen, watch whether the cells rise uniformly and stabilise at the target. A cell that consistently tracks where it should — both during the flush and during oxygen addition — is providing reliable data.
The key insight is this: do not assume the majority is correct simply because the rebreather’s voting algorithm favours it. Two cells can drift together while a single cell remains accurate. The flush gives you the evidence to determine which scenario you are facing.
Responding to Persistent Warnings
A cell warning that clears after a flush and does not return is one thing. A warning that persists demands a different level of attention. Persistent warnings indicate that the voting logic may no longer be maintaining the gas mix you expect, and the margin between the cells has exceeded what the system considers safe.
When Two Cells Read Low
A common scenario involves two cells reading lower than the third by 0.2 bar or more. In this situation, consider lowering your setpoint. This accomplishes two things simultaneously. It allows the lower-reading cells to operate within their functional range, and it brings the PO2 maintained by the system down to a level where even the higher-reading cell remains within safe limits.
Flying Manual
Once you have identified through diluent flushes and observation which cell or cells are providing accurate readings, you have the option of switching to manual control. Flying manual means you — not the solenoid — decide when oxygen enters the loop. This is an advanced response that requires training and practice, but it removes dependence on voting logic that may no longer reflect reality.
Manual control is not an emergency procedure. It is a deliberate choice made by a diver who has diagnosed the situation, identified the trustworthy data source, and decided to fly the rebreather accordingly.
The Value of Regular Practice
A diluent flush takes seconds. It requires no special equipment, no additional training beyond your initial CCR certification, and no deviation from your dive plan. Yet it provides a direct, physics-based verification of your oxygen cells that no amount of electronic monitoring can replace.
Beyond cell verification, the diluent flush confirms something equally important — that breathable, life-supporting gas is actually entering your rebreather. On most dives, at most depths, a diluent flush proves that your gas supply is connected, flowing, and of the expected composition. That alone makes it worth performing regularly, not only when a warning appears.
One exception to note: at shallow depths with hypoxic trimix as your diluent, flushing diluent could temporarily reduce the loop’s oxygen content below safe levels. In this specific scenario, an oxygen flush serves the same diagnostic purpose. The principle remains identical — introduce a known gas and compare the display to the expected value.
Closing Thoughts: The Diver in the Loop
Rebreather technology has advanced remarkably, but no amount of automation replaces the informed diver. Cell warnings exist precisely because the machine recognises the limits of its own decision-making. When a warning fires, it is handing responsibility back to you.
The divers who handle these moments well are not necessarily the most experienced. They are the ones who understand the fundamentals — how gases behave under pressure, what their cells should read at a given depth, and how to methodically verify what they are breathing. These skills are perishable. They reward practice and punish complacency.
We encourage every CCR diver to make the diluent flush a regular part of their diving — not just a response to alarms, but a habit woven into every descent. If you are looking to sharpen your closed-circuit skills or want hands-on guidance with cell diagnostics, reach out to our team to discuss your next step in CCR diving. Explore our AP rebreather range, browse our instructor network, or contact us directly to get started.